Flaky, buttery pastry and juicy heirloom tomatoes are a combination that never needs dressing up, but this tart gives them one smart upgrade: sharp cheddar baked right into the crust. That one change adds a salty, nutty edge that stands up to the tomatoes instead of disappearing under them. The result is a tart with a crisp bottom, tender center, and enough flavor to work as a light dinner, a brunch main, or the first thing gone from an appetizer table.
The trick here is moisture control. Tomatoes can turn a tart soggy fast, so the slices sit on paper towels with salt before they go into the crust. That pulls out some of the juice before it has a chance to seep into the pastry. The other part that matters is keeping the butter cold and chilling the dough before rolling it out, because that’s what gives you those flaky layers instead of a dense, bready shell.
If you’ve ever made a tomato tart that looked gorgeous but ate like wet bread, the steps below will keep that from happening. I’ve also included the small swaps that still keep the tart sturdy, plus the storage note you’ll want if you’re planning ahead.
The crust stayed crisp all the way through and the tomatoes didn’t turn watery after baking. I made it for brunch and everyone kept commenting on the cheddar crust — it tasted like it came from a bakery.
Love the flaky cheddar crust and layered heirloom tomatoes? Save this tart for the next brunch or light-dinner menu.
The Reason This Tart Stays Crisp Instead of Going Soggy
Tomato tarts fail for one main reason: the filling carries too much water into the crust. Baking tomatoes straight from the cutting board gives you a tart that looks beautiful for ten minutes, then softens at the center and turns the bottom pasty. Salting and draining the slices before assembly changes that outcome. It pulls out surface moisture before the tomatoes hit the oven, so the crust has a fighting chance to stay flaky and the cheese can melt without steaming everything beneath it.
The cheddar crust does more than taste good. It helps build a sturdier shell with a little extra fat and protein, which means the pastry browns nicely and doesn’t taste bland under all that tomato. Rolling the dough thin and docking the base with a fork also matters. That keeps the bottom from ballooning up and trapping pockets of raw dough under the cheese.
- Drying the tomatoes first is what keeps the tart from weeping into the crust.
- Sharp cheddar in the dough gives the pastry a deeper flavor and a more structured bite.
- A hot oven sets the crust before the tomatoes have time to release too much more juice.
What Each Ingredient Is Actually Doing in This Tart

- All-purpose flour gives the crust enough structure to hold the filling without becoming heavy. Pastry flour works too, but the crust will be a touch more delicate.
- Sharp cheddar is the ingredient that makes this tart memorable. Use a block and shred it yourself if you can; pre-shredded cheese has anti-caking agents that can make the dough less cohesive.
- Cold unsalted butter is what creates the flakes. Keep it cubed and cold all the way to the food processor. If the butter softens, the crust bakes up dense instead of layered.
- Heirloom tomatoes bring the color and the juicy, sweet-acid balance that makes the whole tart work. Slice them evenly so they bake at the same rate, and use a mix of colors if you want the prettiest finish.
- Mozzarella acts like a mild moisture buffer under the tomatoes. It melts into the crust and helps anchor the slices so they don’t slide around when you cut the tart.
- Garlic and basil add the finishing savory lift. Garlic goes under the tomatoes so it softens in the oven instead of burning on top, and basil waits until the end so it stays fresh and bright.
Building the Tart So the Bottom Bakes, Not Steams
Making the Cheddar Dough
Pulse the flour, cheddar, butter, and salt until you have coarse crumbs with a few pea-sized bits of butter still visible. Those butter pieces are what turn into flakes in the oven. Add the ice water a tablespoon at a time and stop as soon as the dough holds together when squeezed. If you add too much water, the crust bakes up tougher and less crisp.
Draining the Tomatoes
Lay the tomato slices on paper towels, salt them lightly, and let them sit long enough for the paper towels to pick up a little moisture. The goal is not to dehydrate them; it’s to keep the tart from flooding itself during baking. Pat the slices dry before assembly so the salt doesn’t create a puddle in the pan.
Assembling the Layers
Sprinkle the mozzarella and garlic over the bottom of the shell first, then arrange the tomato slices in overlapping rows. That cheese layer acts like a barrier between the crust and the tomatoes, so the base has less direct contact with all that juice. Drizzle the olive oil over the top and finish with the remaining salt. Pack the tomatoes in fairly tightly; gaps allow the slices to slump as they bake.
Baking Until the Edges Brown
Bake until the crust is deeply golden and the tomato slices look softened, not collapsed. The tart should smell toasty and savory, with the cheese bubbling around the edges. If the crust color is still pale, give it a few more minutes even if the tomatoes look done. A blond crust means the bottom will still be soft.
Three Smart Ways to Adapt This Tart
Gluten-Free Crust Swap
Use a 1:1 gluten-free baking flour blend that includes xanthan gum. The crust will still bake up crisp, but it may need a gentler hand when rolling because gluten-free dough cracks more easily. Chill it well and patch any thin spots in the tart pan before adding the filling.
Dairy-Free Version
Swap in a vegan butter that performs well in baking and use a dairy-free shredded cheese that melts cleanly. You’ll lose some of the sharpness from the cheddar crust, so add a pinch more salt and a little extra garlic to keep the tart savory. The texture will still be flaky if the butter stays cold.
Turn It Into a Fuller Main Dish
Add a thin layer of caramelized onions under the mozzarella or serve the tart with a peppery salad and sliced prosciutto on the side. The tart itself stays the same, but the extra savory component makes it feel more dinner-worthy without crowding the tomatoes.
Storage and Reheating
- Refrigerator: Store covered for up to 3 days. The crust softens a bit as it sits because the tomatoes keep releasing moisture.
- Freezer: This tart is best fresh. Freezing changes the tomato texture and usually leaves the crust soggy after thawing.
- Reheating: Warm slices in a 375°F oven for 10 to 12 minutes on a baking sheet. The oven brings back the crust in a way the microwave never will, which just steams the tart and softens the pastry more.
Answers to the Questions Worth Asking
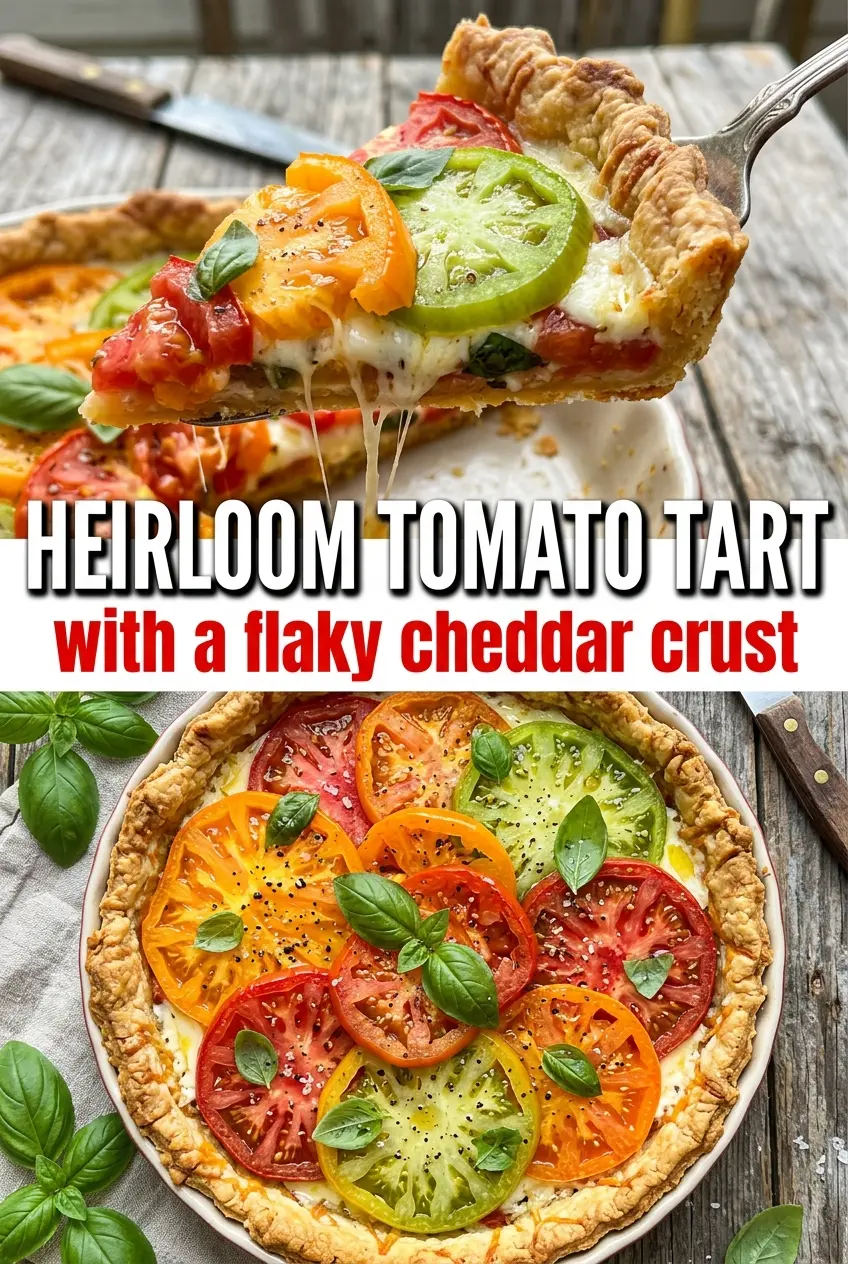
Heirloom Tomato Tart with Cheddar Crust
Ingredients
Equipment
Method
- Pulse the all-purpose flour, shredded sharp cheddar cheese, cold unsalted butter, and salt in a food processor until coarse crumbs form. Add ice water 1 tablespoon at a time until the dough comes together, then keep the mixture crumbly and cohesive.
- Chill the dough for 30 minutes in the refrigerator. This rest helps the butter firm up so the crust bakes flaky.
- Preheat the oven to 400°F. Place a rack in the center so the tart bakes evenly.
- Roll the chilled dough into a 9-inch tart pan and prick the bottom with a fork. Docking prevents large bubbles from forming.
- Lay the mixed heirloom tomatoes on paper towels, sprinkle with 0.5 tsp kosher salt, and let sit for 15 minutes. The salt draws out excess moisture for a less soggy tart.
- Pat the tomato slices dry. Removing surface moisture helps the crust stay crisp.
- Sprinkle the shredded mozzarella and minced garlic over the bottom of the tart crust. Spread them evenly so every bite has a savory base.
- Arrange the tomato slices in overlapping layers over the cheese, drizzle with olive oil, and sprinkle with the remaining kosher salt. Pack the layers slightly for a colorful, uniform top.
- Bake at 400°F for 35–40 minutes, until the crust is golden and the tomatoes are tender. Look for a deep golden edge and softened tomato centers.
- Top with fresh basil and let cool for 10 minutes before slicing. Cooling sets the filling so slices hold their shape.